


创建 rails 项目
以 blog 项目为例:
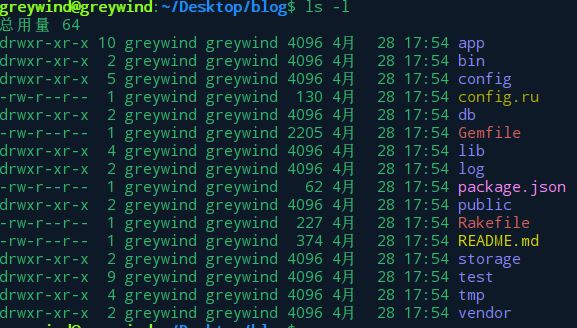
rails new blog只需几秒钟就会得到一个基本的 rails 项目结构:

各个目录的作用为:
- app:存放web应用的控制器、视图、模型、helpers等,开发主要集中在这里
- bin*:各种脚本
- config:路由、数据库等的配置文件
- db:数据库的schema和数据库的迁移文件
- log:日志文件
- package.json:npm包记录,使用yarn管理
- public:静态文件
- test:测试
使用 rails server 命令启动服务器即可在本地3000端口访问到服务

替换首页
使用命令生成控制器 hello
rails generate controller hellorails 自主生成了部分文件:

修改 config/routes.rb 文件配置路由,修改如下:
Rails.application.routes.draw do
	get hello/index

	root hello#index
end
这里定义了路由 hello/index,并且使用 root 方法将首页修改为了 hello 控制器下的 index 方法,也就是两路由的控制器一致。
接下来定义控制器:
class HelloController < ApplicationController
	def index
	end
end
rails足够智能可以自己在视图文件夹寻找名为 index.html.erb 的视图文件,将视图文件写入以下内容
<h1>hello, rails</h1>此时,浏览器中打开 / 和 /hello/index/ 路径都将返回同样的内容

文章的增加
使用以下生成数据库模型:
rails generate model Article title:string content:text
使用以下迁移数据库:
rails db:migrate
迁移成功会出现类似内容:
使用以下命令生成控制器:
rails generate controller Articles
配置 articles 的路由:
resources :articles
使用 rails routes 命令查看当前的路由配置:

很明显,从这里可以看到每个路由应该对应的控制器方法,这是一个典型的RESTful api的配置。
按照上文中的方法创建好 new.html.erb 文件和 new 方法,在 new.html.erb 文件中写入:
<h2>new article</h2>

<%= form_with(scope: :article, url: articles_path, local: true) do |form|  %>
       <p>
       	 <%= form.label :title %> <br>
       	 <%= form.text_field :title %>
       </p>
		<p>
       	 <%= form.label :content %> <br>
       	 <%= form.text_area :content %>
       </p>

       <%= form.submit %>
<% end %>
form_with 方法默认是提交到当前路由,通过url字段将其定义为post到 /articles 路径。
此时访问 /articles/new 路径可以看到表单:

此时我们需要定义提交之后的处理路径,从上面的路由配置中我们可以知道对应于 create 方法
	def create
		@article = Article.new(article_params)
		@article.save

		redirect_to @article
	end
此时提交表单,可以看到报错:

于是我们定义show方法:
	def show
		@article = Article.find(params[:id])
	end
定义相应的视图文件 show.html.erb :
<h2>Show article</h2>
<p>
	title: <br> <%= @article.title %>
</p>
<p>
	content: <br> <%= @article.content %>
</p>
此时提交表单则直接跳转到show视图定义:

文章的列举
我们利用 index action 列举所有的 article,定义 index 方法
	def index
		@article = Article.all
	end
定义视图:
<h2>List all Articles </h2>

<%= link_to new article, new_article_path %>

<% @article.each do |a| %>
<p>
	title: <br> <%= a.title %>
</p>

<p>
	content: <br> <%= a.content %>
</p>

<% end %>
此时访问 /articles 路径可以看到

文章更新
通过路由配置更新分别对应于edit和update两个action,定义edit方法:
	def edit
		@article = Article.find(params[:id])
	end
定义相应的视图文件:
<h2>Edit article</h2>

<%= form_with(model: @article, local: true) do |form| %>
		<p>
       	 <%= form.label :title %> <br>
       	 <%= form.text_field :title %>
       </p>
		<p>
       	 <%= form.label :content %> <br>
       	 <%= form.text_area :content %>
       </p>

       <%= form.submit %>

<% end %>
定义update方法:
	def update
		@article = Article.find(params[:id])
		@article.update article_params
		redirect_to @article
	end
此时可以发现已经可以正常更新了。
删除文章
首先在文章列表页声明删除文件的链接,修改为:
<h2>List all Articles </h2>
<%= link_to new article, new_article_path %>
<% @article.each do |a| %>
<p>
	title: <br> <%= a.title %>
</p>
<p>
	content: <br> <%= a.content %>
</p>
<p>
	<%= link_to edit, edit_article_path(a) %> <br>
	<%= link_to delete, article_path(a), method: :delete %>
</p>
<% end %>
定义 destroy 方法:
def destroy
	@article = Article.find(params[:id])

	@article.destroy

	redirect_to articles_path
end
此时已经可以删除文件了。
数据验证
将 model 文件夹下的 article.rb 文件修改为
class Article < ApplicationRecord
	validates :title, presence: true, length: {minimum: 5}
	validates :content, presence: true
end
将 new 对应的视图文件修改为:
<h2>new article</h2>

<%= form_with(model: @article, url: articles_path, local: true) do |form|  %>
	<% if @article.errors.any? %>
	<div>
		<%= @article.errors.count.to_s%> erors
	</div>
	<% end %>
       <p>
       	 <%= form.label :title %> <br>
       	 <%= form.text_field :title %>
       </p>
		<p>
       	 <%= form.label :content %> <br>
       	 <%= form.text_area :content %>
       </p>

       <%= form.submit %>
<% end %>
将控制器的 new action 修改为:
	def new
		@article=Article.new
	end
create action 修改为:
       def create
		@article = Article.new(article_params)
		if @article.save
			redirect_to @article
		else
			render new
		end

	end
此时,一个简单的带数据验证的 crud 就实现了。


请登录后查看评论内容